|
Valve Adjustment Instructions, with pictures
This should be done at least once a year with the DRZ.
WIth the bike left cool overnight, remove the tank, seat, spark plug, and radiator shrouds.
-Remove the black center cap on the ignition side cover AND the smaller allen cap just above it. Make sure this area is CLEAN before hand, don't want any dirt falling in there!
-Slowly turn the center nut attached to the crankshaft with a socket wrench (17mm) untill you see the TDC mark in the hole above it. This turns the crank until you hit tdc...
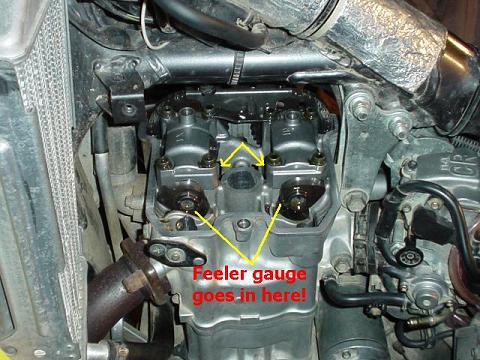
-Now remove the hoses attached to the valve cover, then remove the cover itself via the 3 allen bolts. Once again, make sure this area (especially under the framerail) is absolutley clean before hand.
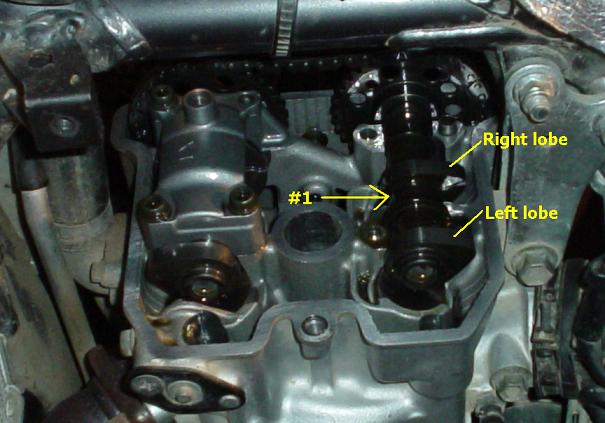
-The camlobes should be facing at 10 o'clock and 2 o'clock when you look under the valve cover.
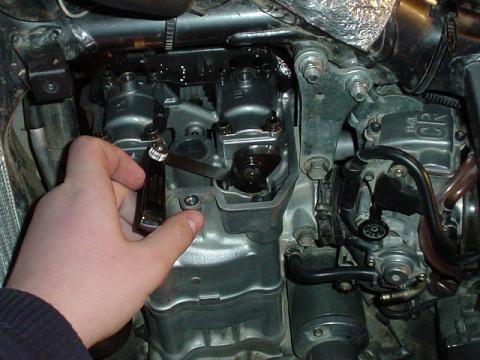
-Using a set of feeler gauges, stick the gauges between the bottom of the camlobe and the shim, which is directly underneath it. For intake, I would start with a .1mm gauge, work your way up until there is just a slight drag on the feeler gauge. Also make sure that you have the metal on the feeler gauge level with the shim, that is NOT going in at an angle. This will result in innaccurate results.
-Repeat this with all 4 shims. The clearances on the intake (closest to carberateur) lobes should be .10-.20mm (.004-.008") The clearances on the exhaust (front of engine) lobes should be .20-.30mm (.008-.012").
- If you are within specs (most likely) you are set to pucker it all up. If not, then you have to do some math to figure out what shims you need. To change the shims you must remove camchain tensioner, cams, change out the shims...etc. So lets just hope you are in spec for now!
-OK, so now all ya gotta do is bolt that valve cover back on. Use 7ft-lbs initially and then torque the allens down to 10ft-lbs finally. Don't forget to install both of the caps as well, and do not tighten down the large center cap too much (I don't know the lb-ft off hand).
-Put in sparkplug, put on tank, etc. and you just saved yourself about from having the dealer do it!
|